1-Introduction:
every component in Vue is divided into three main parts (state, view, and actions).
Here is an example of a simple couter app in Vue:
new Vue({
  // state
  data () {
    return {
      count: 0
    }
  },
  // view
  template: `
    <div>{{ count }}</div>
  `,
  // actions
  methods: {
    increment () {
      this.count++
    }
  }
})
state-> is about all data shared in that component or app.
view-> is about the DOM and what the user will be seeing.
actions-> is about functions that are going to handle your code and your data.

Components are very helpful for building and reusing your app.
However, the simplicity of your app quickly breaks down when we have multiple components that share a common state, for example when you have:
- Multiple views may depend on the same piece of state.
- Actions from different views may need to mutate the same piece of state.
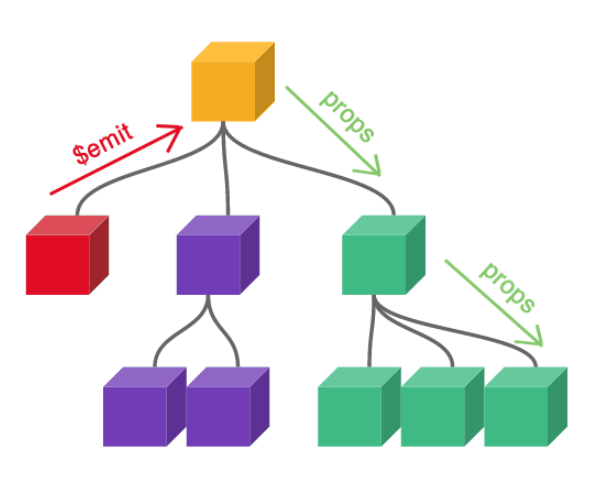
Since it might be tedious to have of deeply nested components or to have two sibling components (child of the same root), where communication between the two Sibling components is impossible.
Neither Props nor Emitting an event is going to work.
That’s where Vue comes in Vuex.
2-Definition and Uses:
Vuex is a state management pattern + library for Vue.js applications.
Vuex takes all shared state out of the components and manages it in a global singleton (manages them in a single source of truth).
Using Vuex, any component will be able to access the state(data) or trigger actions(methods & computed…), no matter where they are in the tree.
3-Installation:
using CDN:
Include Vuex after Vue and it will install itself automatically:
<script src="/path/to/vue.js"></script>
<script src="/path/to/vuex.js"></script>
Using a Pachage Manager (NPM or Yarn):
npm install vuex --save
or
yarn add vuex
Promise
Vuex requires Promise. If your supporting browsers do not implement Promise (e.g. IE), you can use a polyfill library, such as es6-promise.
Include it via CDN:
<script src="https://cdn.jsdelivr.net/npm/es6-promise@4/dist/es6-promise.auto.js"></script>
now Then window.Promise will be available automatically.
but you can install it using a package manager (NPM or Yarn).
npm install es6-promise --save # NPM
yarn add es6-promise # Yarn
Now what you got to do, is to add this line of code into anywhere in your code before using Vuex:
import 'es6-promise/auto'
if you want to use the latest dev build, clone directly from GitHub:
git clone https://github.com/vuejs/vuex.git node_modules/vuex
cd node_modules/vuex
npm install
npm run build
4-When to use Vuex?
- Medium-to-large-scale SPA SPA.
- Very complicated app.
- deeply nested and complicated components.
- Searching for better handling to your state outside of your Vue components.
note:
if your app is simple, you will most likely be fine without Vuex. Consider a simple store pattern instead.
5-How to use Vuex?
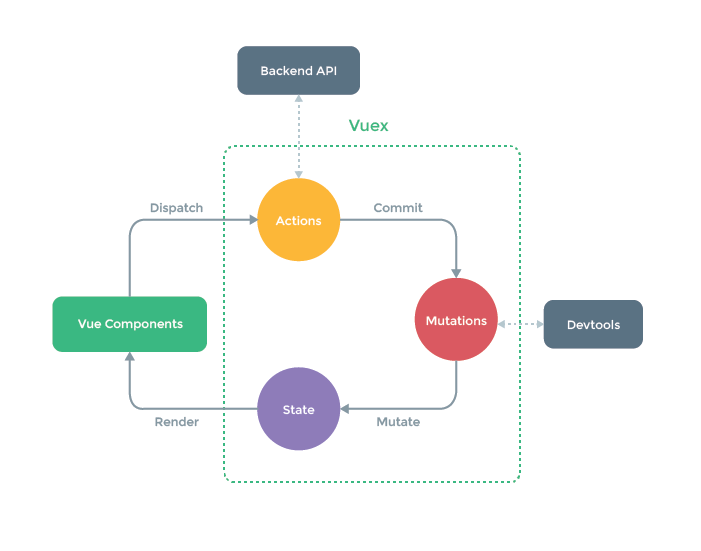
withing any Vuex System there is a store.
A store is a container that holds your applications’ state.
A store in Vuex is:
- reactive: for components retrieving state from the store; When your store state is updated your components are reactively and efficiently update.
-
effectively isolated: this means you cannot directly mutate the store’s state, only by explicitly
committing mutations. this allows you to track your state changes, in addition to allowing many tooling in Vue dev tools which allow you to understand your app even better.
now you are ready!
Simple Example to get started:
import Vue from 'vue'
import Vuex from 'vuex'

Vue.use(Vuex)

const store = new Vuex.Store({
  state: {
    count: 0
  },
  mutations: {
    increment (state) {
      state.count++
    }
  }
})
Now, you can access the state object as store.state , and trigger a state change with the store.commit method:
store.commit('increment')
console log the result after icrement:
console.log(store.state.count) // -> 1
you can access the store in any component you want using this.$store, but first, you need to provide your store to Vue instance:
new Vue({
  el: '#app',
  store: store,
})
Vuex will be injecting the store into all child components starting from the root component with the store option.
How to commit a mutation from a component?
If you wanted to explicitly keep track of everything going on and understand your code, and to implement tools that can log every mutation, take state snapshots, or even perform time travel debugging.
you can do this:
methods: {
  increment() {
    this.$store.commit('increment')
    console.log(this.$store.state.count)
  }
}
Otherwise, you can simply change store.state.count directly, but it’s not recommended.
6-Example (counter app)
#HTML

   <div id="app">
      <p>{{ count }}</p>
      <p>
        <button @click="increment">+</button>
        <button @click="decrement">-</button>
      </p>
   </div>
#HTML

    ## make sure to call Vue.use(Vuex) if using a module system

    const store = new Vuex.Store({
      state: {
        count: 0
      },
      mutations: {
      	increment: state => state.count++,
        decrement: state => state.count--
      }
    })

    new Vue({
      el: '#app',
      computed: {
        count () {
    	    return store.state.count
        }
      },
      methods: {
        increment () {
          store.commit('increment')
        },
        decrement () {
        	store.commit('decrement')
        }
      }
    })
Following the code, after clicking increment button, increment() method is called.
 increment () {
          store.commit('increment')
        },
therefore we will commit to the store using this statement store.commit('increment')
this is exactly the same as committing an event when trying to pass data to the parent Component, exactly the same!
so afterward, the Increment Mutation will be initiated and the state.count will be incremented.
increment: state => state.count++
Play around with this app on Jsfiddle playground: https://jsfiddle.net/n9jmu5v7/1269/
